
Truth or not, some time ago I heard that the Arch Linux wiki is one of the best sources of Linux documentation. I didn’t even knew what Arch was, but the idea of learning about it began bugging my head until now.
There are many reasons to decide to embrace or reject this distro. I wanted to go for Arch to 1) get out of the comfort zone and do something that challenges me, a lot, and 2) a DIY installation is capable of teaching you a lot of concepts by doing instead of just reading and saying “sure, makes sense”.
Middle ground
Some people are used to distros that go as simple as creating a bootable image of an OS and follow the GUI steps with very little(eg. dual boot) to no research at all. Arch will take your sweet GUI-lollipop, toss it to the floor and step over it while taking your lunch money, then it will give you the wiki, which is pretty much not what you think your deserve but what you need if you want to play with the big kids (or the toxic ones if you will).
It’s easy to, either, not understand a thing from a section because of the layers of abstraction above your knowledge, or to fall into a rabbit-hole of hyperlinks.
This post is intended to support your learning curve. A middle ground between the whole comprehensive guide (which I totally recommend to read after or along this) and the the quick video to blindly follow step-by-step without understanding half of the commands. Take this as a complementary material, to see side by side or as a previous work to get the concepts.
Read the documentation, use this post as support. I’m writing the guide I believe I would have liked to have 🙂
This is what worked well for me and what I was able to interpret and learn from the docs. This is by far not the only way or the best to do it this, and as a human being I’m also prone to errors.
Any objective feedback is welcome!
I’m about to start, what do I need?
- Time. If you don’t have a solid Linux background, consider your learning curve as learning a new programming language. You can’t expect to just master it in a couple of hours.
- Disable secure boot (I’m not giving directions on this one, it will depend on your computer, but is quick to find on google)
- Get an image from the official site, the BitTorrent is better since HTTP images could get corrupted (verify the signature).
What’s that gpg command?
gpg
To do this download your ISO and the signature from the checksums
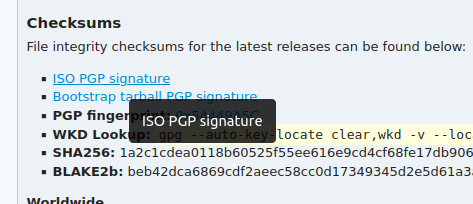
I like to verify the signature(.iso.sig) against the ISO image, from the docs:
$ gpg --verify archlinux-version.iso.sig /path/to/archlinux-version.iso
Create the bootable USB (or other method you want)
There are lots of tools and tutorials to this in google. In my case, my Ubuntu’s Make Startup Disk didn’t want to cooperate with me, so I used dd instead and ran this quick command, easy-peasy:
$ sudo dd bs=4M if=/path-to/archlinux-version-x86_64.iso of=/dev/sdX status=progress oflag=syncI’m into the installer in the command prompt, what now?
(Optional) List your packages
Personal advice: This is a great place to start creating a list of the packages you’ll need to make your computer functional to your needs. It’s really easy to miss, for example, a dependency to connect to wifi, so I’ll be dragging this one around:
# Booting packages
# Linux packages
# Network packages
# Partition tools
# Text editing
I’ll mark any relevant package with this notation: package
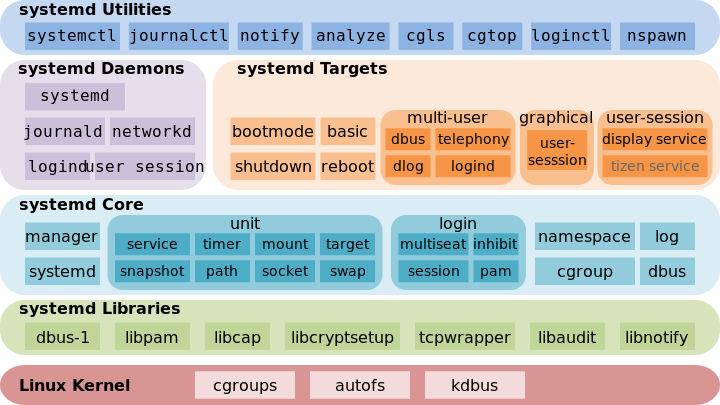
Init system: systemd
I’ll skip the boot environment, keyboard layout/font and boot mode since those are straightforward, and jump to systemd before connecting to the internet to explain this topic which is sometimes rusty.
Systemd is an init system, which means it’s the first process started in the system boot by the kernel(PID 1). It:
- Contains the basic building blocks for the OS as a system and service manager.
- Starts the rest of the processes (daemons, a background process, traditionally ended in ‘d‘)
- Keeps track and logs of processes.
- Handles aggressive parallelization.
You don’t need to manually install the systemd package, since it will later come as a dependency of base package. I’ll add both to our cheat sheet to keep a track.
# Booting packages
# Linux packages
base           # Minimal set for basic Arch install
#systemd        # base dependency
# Network packages
# Partition tools
# Text editing
Connecting to the internet (wifi case)
This section is for use with the installation media and your computer's post-installation use. Don't take wifi for granted if it worked during installation, you'll need to add the dependencies and set it up after installation as well.
| Status | Network manager source | Connection status | Actions |
| Pre-install (root@archiso) | From ISO (iwd) | Must connect (temporary) | Connect to internet, download and install packages |
| Install (root@archiso /) | From ISO (iwd) | Connected | Download and install more packages |
| Post-install (root@archlinux) | From drive | Must connect (permanently) | Connect and move keep learning |
It’s pretty nice and easy to click the 🛜 button, chose your network, input your password and browse the web, however that’s encapsulating what is really going on, so first let’s start with the caveat that you may miss:
rfkill
(util-linux package, dependency of base package) Is a tool to enable/disable wireless devices. Start by checking any physical button that can block/unblock your wifi card (hard block). Those crazy bastards can waste your troubleshooting effort because you forgot they existed. Then check and fix any software generated block (soft block)
root@archiso ~ # rfkill                # Check device statuses
ID TYPE      DEVICE      SOFT      HARD
 0 bluetooth hci0     blocked unblocked
 1 wlan      phy0     blocked unblocked

root@archiso ~ # rfkill unblock wlan   # Unblock wlan for wifi
root@archiso ~ # rfkill                # Re-check
ID TYPE      DEVICE      SOFT      HARD
 0 bluetooth hci0     blocked unblocked
 1 wlan      phy0   unblocked unblocked
Understanding your network config
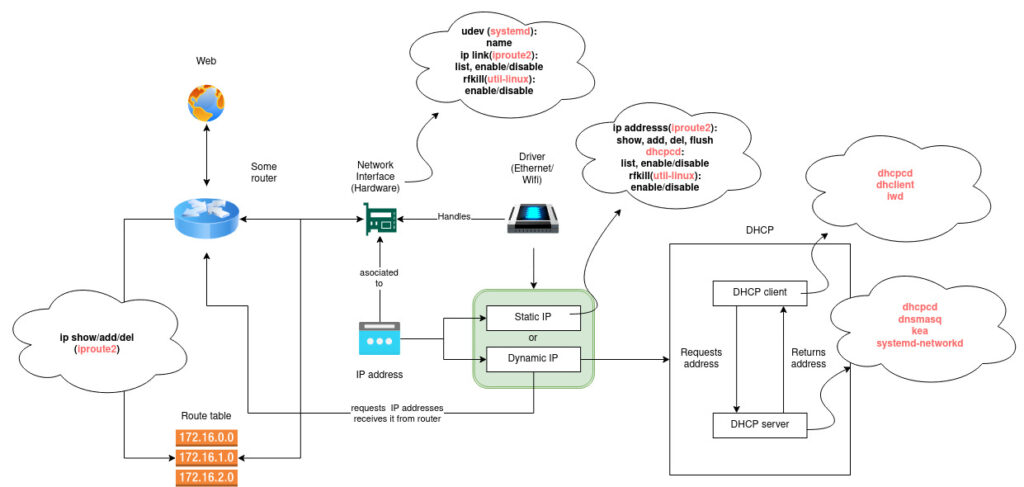
In a nutshell, we have:
- Network interface: Physical piece of hardware
- Named by udev, a userspace system to enable OS admin to register userspace handlers for events. (
systemdpackage) - Find them with either:
ip link(iproute2package, dependency ofbasepackage).ls /sys/class/net(lsis incoreutilspackage, a default, so don’t worry about this one)
- Enabled/Disabled by
ip linkas well.
- Has an IP address associated to it (chose your favorite and set up)
- Static: configured with most standard network managers and dhcpcd.
- Dynamic: you’ll need:
- A DHCP client (
dhcpcdpackage, ordhclientpackage, oriwdpackage)
A DHCP server (dhcpcdpackage, ordnsmasqpackage, orkeapackage, orsystemd-networkd)
- A DHCP client (
- Named by udev, a userspace system to enable OS admin to register userspace handlers for events. (
- Route table: Determine if you can reach an IP address directly or what gateway (router) you should use.
- Hostname: The name your computer shows as a web host
- Ping: Utility to test reachability of a host on an IP network (
iputilspackage, dependency ofbasepackage)
Connect with iwd (lost after reboot)
Here we set up a non permanent internet connection (can be made permanent) and will be lost after reboot. Following iwd’s guide is pretty straightforward:
root@archiso ~ # iwctl              # Start iwd's interactive prompt
[iwd]# device list                  # List your network interface
...
[iwd]# device <your-device> set-property Powered on # Turn on your device
[iwd]# station <your-device> scan          # Check for available networks
[iwd]# station <your-device> get-networks  # Print them
...
[iwd]# station <your-device> connect <network>  # Connect
[iwd]# exit                         # Or ctrl-d
If you want this particular method to be permanent, see how write unit files in this guide. Once out of iwd you may test with ping:
root@archiso ~ # ping archlinux.org
PING archlinux.org ...
64 bytes from archlinux.org ....
64 bytes from archlinux.org ....
64 bytes from archlinux.org ....
64 bytes from archlinux.org ....
if you see no response, something went wrong and you are not connected.
Connect with a network manager (permanent)
Take this as the first step of chroot in the configuration section, skip it here and I’ll put a hyperlink there to get back to this one. I’m putting it here to avoid a split in the wifi section.
There are many options (connman, dhcpcd, netctl, networkmanager, or systemd-networkd). I chose NetworkManager because it works pretty well for me on Ubuntu and because I found some good references of it on laptops.
[root@archiso /]# pacman -S networkmanager        # Install package
[root@archiso /]# systemctl enable NetworkManager # Enable service
Don’t reboot just yet, specially if you haven’t done the boot loader set up. Finish the chroot part of the installation first.
After reboot, to connect to wifi you’ll need to do this:
$ nmcli device wifi list
$ nmcli device wifi connect <network> password <password>

# That's it! Now you have a persistent wifi connection with NetworkManager!
So far our cheat sheet looks like this:
# Booting packages
# Linux packages
base           # Minimal set for basic Arch install
#systemd        # base dependency, init system, network management
#util-linux     # base dependency, rfkill soft/hard blocks

# Network packages
networkmanager # Network manager
#connman        # Network manager (other)
#netctl         # Network manager (other)
#iwd            # DHCP client
#dchpch         # DHCP client and server (network manager)
#dhclient       # DHCP client
#dnsmasq        # DHCP server
#kea            # DHCP server
#iputils        # base dependency, ping
#iproute2       # base dependency, ip link

# Linux packages
# Network packages
# Partition tools
# Text editing
Set up the disk
Partitions go pretty straightforward. To keep it simple I’ll trim a few things here, however I encourage you to dive deeper into this section.
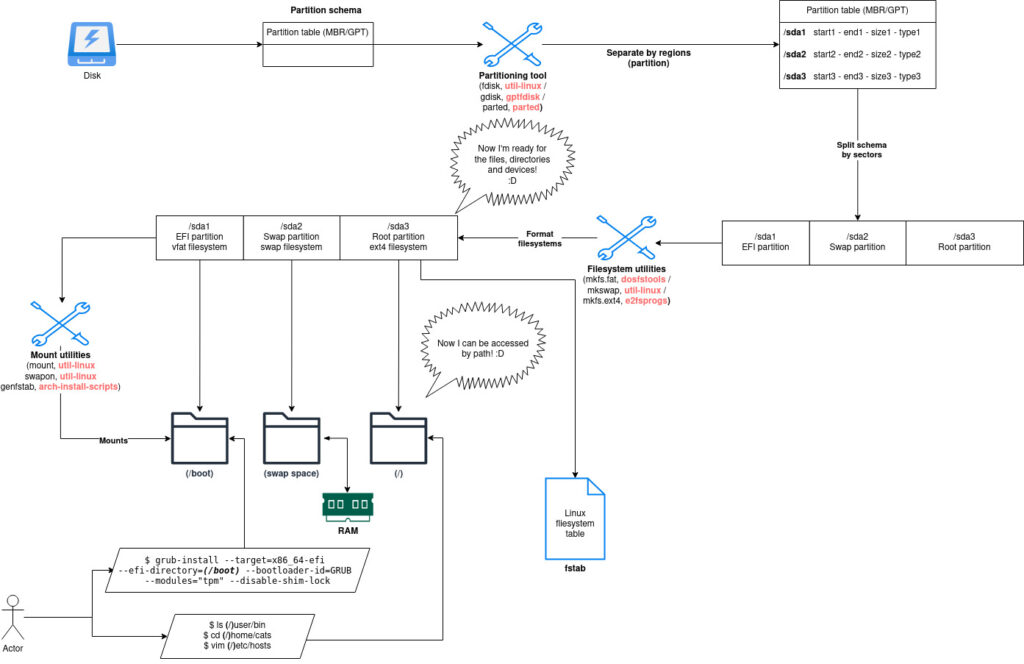
In a nutshell:
- Use a partition tool(
fdisk,partedorgptdisk) to: - Format a file system into each partition according to it’s type. The filesystem controls how data is stored and retrieved
- Mount. This makes the filesystem available to the system.
- Generate fstab (linux filesystem table) which is read by programs that work with disk partitions and other file systems
Partition
Let’s see how to make a basic partition layout with fdisk (util-linux package), here are 3 basic commands to help you use the interactive prompt:
- g: create a new GPT partition schema (I’ll focus my example on a GPT)
- n: create a new partition
- t: change the type of a partition
- l: list partition types
- p: print your changes
Start by running fdisk -l to list the block devices:
- Identify your disk written like this
/dev/sda,/dev/nvme0n1or/dev/mmcblk0 - Ignore /dev/
rom, /dev/loopor /dev/airoot - Double check the size, your bootable USB will appear there as well
Take an example of a simple non-nvme 500GB SSD drive, /dev/sda, and create a simple layout:
- EFI (1GB, suggested is no less than 1GB)
- Swap (4GB)
- Root(x86-64) (~442GB)
root@archiso ~ # fdisk /dev/sda     # Start fdisk prompt on /dev/sda
Command (m for help): p             # Print current schema

Disk /dev/sda: 447.13 GiB, 4801039810560 bytes, 937703088 sectors
Disk model:KINGSTON SA400S3
...

Command (m for help): g             # Create new GPT table
Created a new GPT disklabel ...

# Let's create the partitions

Command (m for help): n             # Create first partition, EFI
Partition number (1-128, default 1): 1         # Follow default
First sector (2048-10..., default 2048): 2048  # Follow default
Last sector ....: +1G                          # Give it 1GB

Created a new partition...
Do you want to remove the signature? [Y]es/[N]o: Y  # This means this disk has things in these sectors, the drive is used already and we are formatting, this example formats the whole drive, be careful

The signature will be removed by a write command

Command (m for help): n             # Create second partition, swap
Partition number (2-128, default 2): 2         # Follow default
First sector (2099200 -..., 2099200): 2099200  # Follow default
Last sector ....: +4G                          # Give it 4GB

Created a new partition 2 of type 'Linux filesystem' and size of 4 GiB

Command (m for help): n             # Create second partition, root
Partition number (3-128, default 2): 3           # Follow default
First sector (10487808 -..., 10487808): 10487808 # Follow default
Last sector ...., default 937701375): 937701375  # Give it the rest of the disk (default)

Created a new partition 3 of type 'Linux filesystem' and size of 442.1 GiB

# Let's give them a type

Command (m for help): t             # Type EFI System to EFI
Partition number (1-3, default 3): 1          # EFI is on partition 1
Partition Type or alias(type L to list all): L  # Check options
Partition Type or alias(type L to list all): 1  # EFI System option

Changed partition 'Linux filesystem' to 'EFI System'

Command (m for help): t             # Type Linux swap to Swap
Partition number (1-3, default 3): 2            # Swap is on partition 2
Partition Type or alias(type L to list all): 19 # Linux swap option

Changed partition 'Linux filesystem' to 'Linux swap'

Command (m for help): t             # Type Linux root to root
Partition number (1-3, default 3): 3            # Root is on partition 3
Partition Type or alias(type L to list all): 23 # Linux root (x86-64) option

Changed partition 'Linux filesystem' to 'Linux root (x86-64)'

Command (m for help): p             # Check everything is all right
Disk /dev/sda: 500 GiB ...

Device             Start        End   Sectors   Size Type
/dev/sda1           2048    2099199   2097152     1G EFI System
/dev/sda2        2099200   10487807   8388608     4G Linux swap
/dev/sda3       10487808  937701375 927213568 442.1G Linux root (x86-64)

Command (m for help): w             # Save everything and exit
The partition table has been altered.
...
Now let’s check our new partitions by listing our block devices with lsblk (util-linux package):
root@archiso ~ # lsblk -f     # List all about our filesystems
NAME   FSTYPE   FSVER LABEL UUID    FSAVAIL FUSE% MOUNTPOINTS
loop0  squashfs 4.0                       0  100% /run/archiso/airootfs
sda
├─sda1
├─sda2
└─sda3
sdb ... (external USB) ...

# Good, our new partitions exists! Let's format the FS into them
Here loop0, is a decide that treats files with a filesystem image as if they were block devices. This is your installation media. Squashfs is a compressed read-only file system. sda is our disk.
Format each filesystem
The file system controls how data is stored and retrieved, separating it into pieces and giving each piece a name to be easily isolated and identified. Each filesystem obeys it’s own logic and rules according to the usecase.
Each partition is used on a different kind of behavior:
- UEFI/BIOS: Both are two firmware interfaces to start the operating system. UEFI supports FAT12, FAT16, and FAT32 file systems. It is recommended to use FAT32. Created with
mkfs.fat(dosfstoolspackage) - Swap: The process to take a page of memory and copy it into the swap space to free up that page of memory. Created with
mkswap(util-linuxpackage) - Root: This is the top of the hierarchy where the primary filesystem is mounted and from which all other filesystems stem. It’s the filesystem on top of which all other file systems are mounted as the system boots up. There are many options to create, here we’ll use EXT4 with
mkfs.ext4(e2fsprogspackage)
This one goes pretty straightforward in our example (I’m trimming some results for simplicity):
root@archiso ~ # mkfs.fat -F 32 /dev/sda1  # Format EFI partition to FAT32
mkfs.fat 4.2 (2021-01-31)
root@archiso ~ # mkswap /dev/sda2          # Format swap partition to swap area
Setting up ...
root@archiso ~ # mkfs.ext4 /dev/sda3       # Format root partition to EXT4
mke2fs 1.47.0 ...
So now let’s re-check our with lsblk:
root@archiso ~ # lsblk -f     # List all about our filesystems
NAME   FSTYPE   FSVER LABEL UUID    FSAVAIL FUSE% MOUNTPOINTS
loop0  squashfs 4.0                       0  100% /run/archiso/airootfs
sda
├─sda1 vfat     FAT32       <UUID>
├─sda2 swap     1           <UUID>
└─sda3 ext4     1.0         <UUID>
sdb ... (external USB) ...
Mount the filesystems
Mounting is the only way to make a file system available. It enables file systems, files, directories, devices and special files for use at a given location. In simple words we link the directory to a filesystem:
- Root: link our new ext4 filesystem to
(/)path - EFI: link our new vfat filesystem to
(/boot)path (or other)
Regarding our commands for this part:
- The
mountcommand (util-linuxpackage) attaches the filesystem. It instructs the operating system that the filesystem is ready to use and associate it with a particular point in the system’s hierarchy. - The swapon command (
util-linuxpackage) will enable out swap area. - The genfstab (
arch-install-scriptspackage, ignoring this one, we use it on install)
Now let’s mount the filesystem(I chosed UEFI boot to /boot):
root@archiso ~ # mount /dev/sda3 /mnt               # mount root parition to /mnt (This is a generic mount point)
root@archiso ~ # mount --mkdir /dev/sda1 /mnt/boot  # mount UEFI system to EFI system partition
root@archiso ~ # swapon /dev/sda2                   # Enable swap partition
root@archiso ~ # mkdir -p /mnt/etc                  # Create dir for fstab
root@archiso ~ # genfstab -U /mnt >> /mnt/etc/fstab # Generate fstab file
And after this, we have:
root@archiso ~ # lsblk -f     # List all about our filesystems
NAME   FSTYPE   FSVER LABEL UUID    FSAVAIL FUSE% MOUNTPOINTS
loop0  squashfs 4.0                       0  100% /run/archiso/airootfs
sda
├─sda1 vfat     FAT32       <UUID>    1022M    0% /mnt/boot
├─sda2 swap     1           <UUID>                [SWAP]
└─sda3 ext4     1.0         <UUID>     412G    0% /mnt
sdb ... (external USB) ...

# Nice! Our partitions are created, formatted and mounted!!
With all this, our cheat sheet looks like this:
# Booting packages
# Linux packages
base           # Minimal set for basic Arch install
dosfstools     # UEFI/BIOS filesystem util
e2fsprogs      # EXT4 filesystem util
#systemd        # base dependency, init system, network management
#util-linux     # base dependency, rfkill (soft/hard blocks), fdisk (partition tool), lsbkl (block devices), mkswap (swap filesystem), mount, swapon

# Network packages
networkmanager # Network manager
#connman        # Network manager (other)
#netctl         # Network manager (other)
#iwd            # DHCP client (I'll chose this)
#dchpch         # DHCP client and server (network manager)
#dhclient       # DHCP client
#dnsmasq        # DHCP server
#kea            # DHCP server
#iputils        # base dependency, ping
#iproute2       # base dependency, ip link

# Partition tools
#parted         # Other option than fdisk
#gptdisk        # Other option than fdisk

# Text editing
I got this, let’s install
I thrust you’ll handle the mirrors like a champ. Let’s move on to packages:
Essential packages
So far we have a set of file systems that are mounted in your drive, but so far we can only interacting with them with the installation media’s software. All commands you execute live on there and will disappear once you unplug that USB (or other) so let’s set up the essentials packages to have a basic arch linux install:
- A boot loader
- A basic arch linux distro (see bellow)
- Filesystem utils (we just covered that one)
- Specif firmware: some firmware for other devices may not be in linux firmware. (You’ll need to research according to your hardware)
- Networking software: covered here (for this post I selected
networkmanagerpackage). - Text editor: pick your favorite(
vim,nano,emacs, …) - Documentation sources (
man-db,man-pagesandtexinfo) - You could take a look at what’s on your installation media as well.
Right now I’ll only install the most basic arch linux distro. The rest of the packages we selected will be picked on the next section. However is up to you to choose to install them now.
What does it mean to have a basic arch linux distro?
- It has a kernel:
- The basic program at the core of the OS that always lives in memory, controlling all hardware resources, solving conflicts and optimizing them, and enables hardware-software interactions (I’ll chose
linuxpackage)
- The basic program at the core of the OS that always lives in memory, controlling all hardware resources, solving conflicts and optimizing them, and enables hardware-software interactions (I’ll chose
- It has firmware:
- Has a package distributed alongside the kernel with firmware binary blobs necessary for partial or full functionality of certain hardware devices(
linux-firmwarepackage)
- Has a package distributed alongside the kernel with firmware binary blobs necessary for partial or full functionality of certain hardware devices(
- It has a minimal set to define an Arch Linux installation (our famous
basepackage)
root@archiso ~ # pacstrap -K /mnt base linux linux-firmware  # Basic Arch distro, literally basic

# Congratulations!!! You just installed Arch BTW :D

root@archiso ~ # pacstrap -K /mnt man-db man-pages textinfo  # Documentation packages
Having done this, our cheat sheet looks like this (don’t worry, I’ll clean it up at the end):
# Booting packages

# Linux packages
base           # Minimal set for basic Arch install
linux          # Kernel
linux-firmware # Firmware alongside kernel
dosfstools     # UEFI/BIOS filesystem util
e2fsprogs      # EXT4 filesystem util
man-db         # Documentation
man-pages      # Documentation
texinfo        # Documentation
#systemd        # base dependency, init system, network management
#util-linux     # base dependency, rfkill (soft/hard blocks), fdisk (partition tool), lsbkl (block devices), mkswap (swap filesystem), mount, swapon

# Network packages
networkmanager # Network manager
#connman        # Network manager (other)
#netctl         # Network manager (other)
#iwd            # DHCP client (I'll chose this)
#dchpch         # DHCP client and server (network manager)
#dhclient       # DHCP client
#dnsmasq        # DHCP server
#kea            # DHCP server
#iputils        # base dependency, ping
#iproute2       # base dependency, ip link

# Partition tools
#parted         # Other option than fdisk
#gptdisk        # Other option than fdisk

# Text editing
vim             # This guide's champion
nano            # Sometimes you mess vimrc, so it comes in handy
#emacs
Configure
I also thrust you’ll handle timezone, localization, network configuration and root password with no issue, so let’s focus on more challenging stuff here. Let’s now switch to our new root directory (or chroot):
root@archiso ~ # arch-chroot /mnt                 # Change to root dir
[root@archiso /]#
Boot loader (UEFI case example)
You could mess up your start up here. Pay good attention and don’t skip this step, your machine could not boot if this is not properly set up.
The firmware(BIOS or UEFI) will be the first program executed after turning on the computer and it will start the boot loader. Then the boot loader will load the kernel and any external initramfs images.
There are many options to chose. For this guide I’ll go for grub(grub, efibootmgr and optionally os-prober to detect other OS).
If you are following arch grub’s wiki you may get some confussion here, since on step one it asks you to mount the EFI partition and substitute esp with it’s mount point. We alredy did that, and it is /boot, so we only need to chose a boot loader identifier for grub, I’ll use GRUB straightforward:
[root@archiso /]# pacman -S grub efibootmgr      # Essential grub packages
...
[root@archiso /]# pacman -S os-prober            # Optionalto detect other OS
...
[root@archiso /]# grub-install --target=x86_64-efi --efi-directory=/boot --bootloader-id=GRUB                             # Install grub in /boot
Installing for x86_64-efi platform.
Installation finished. No error reported.
[root@archiso /]# grub-mkconfig -o /boot/grub/grub.cfg  # Generate main configuration file
With this said, here’s the cheat sheet updated to boot packages:
# Booting packages
grub           # Boot loader
efibootmgr     # Writes grub entries to NVRAM
#os-prober      # Optional to detect other OS on boot

# Linux packages
base           # Minimal set for basic Arch install
linux          # Kernel
linux-firmware # Firmware alongside kernel
dosfstools     # UEFI/BIOS filesystem util
e2fsprogs      # EXT4 filesystem util
#systemd        # base dependency, init system, network management
#util-linux     # base dependency, rfkill (soft/hard blocks), fdisk (partition tool), lsbkl (block devices), mkswap (swap filesystem), mount, swapon

# Network packages
networkmanager # Network manager
#connman        # Network manager (other)
#netctl         # Network manager (other)
#iwd            # DHCP client (I'll chose this)
#dchpch         # DHCP client and server (network manager)
#dhclient       # DHCP client
#dnsmasq        # DHCP server
#kea            # DHCP server
#iputils        # base dependency, ping
#iproute2       # base dependency, ip link

# Partition tools
#parted         # Other option than fdisk
#gptdisk        # Other option than fdisk

# Text editing
vim             # This guide's champion
nano            # Sometimes you mess vimrc, so it comes in handy
#emacs
Configure essential packages
Our cheat sheet has been an aid to track what we need for a very basic installation. There are still some missing dependencies for the post-install process (eg. sudo, which, etc). Now we only need to install the missing packages from the cheat sheet:
[root@archiso /]# pacman -S dosfstools e2fsprogs # File system utils
[root@archiso /]# pacman -S networkmanager       # Network manager
[root@archiso /]# pacman -S vim nano             # Text editors
Many of the packages we encountered in the wiki and tracked in the cheat sheet are included in base or util-linux (which is a base dependency), so we have very few things here, however depending on what your software decisions were you may have more or less packages here.
If you are not sure to have a package you can list them here:
[root@archiso /]# pacman -Q # List installed packagesA trimmed and cleaner version of the cheat sheet we did here looks like this:
# Booting packages
grub           # Boot loader
efibootmgr     # Writes grub entries to NVRAM
os-prober      # Optional to detect other OS on boot

# Linux packages
base           # Minimal set for basic Arch install
linux          # Kernel
linux-firmware # Firmware alongside kernel
dosfstools     # UEFI/BIOS filesystem util
e2fsprogs      # EXT4 filesystem util

# Network packages
networkmanager # Network manager

# Text editing
vim             # This guide's champion
nano            # Sometimes you mess vimrc, so it comes in handy
Final thoughts
I hope that if you followed this guide, alongside the installation wiki your learning curve was smoother and more manageable. Arch linux has a very nice documentation and a basic install like is really something simple. What is complicated at times is lerning to pick the right piece to read and understand it.
When working with less abstraction and more manually there’s a lot learn, and a lo of mistakes to do, so prepare to set up your environment a few times while continuing your journey with arch.
Friendly remainder (just in case)
Wrap up
[root@archiso /]# exit                          # or Ctrl+d
root@archiso ~ # umount -R /mnt                 # Unmount "busy" parition
root@archiso ~ # reboot

# If you find Grub's menu after reboot, well done! If not, you missed a step in boot loading
After reboot:
Arch Linux 6.4.12-arch1-1 (tty1)

<hostname> login: root
Password: <password>

[root@<hostname> ~]# echo 'Hello arch!'      # Now go make a user :)
From now on it is up you to decide what goes next (some general suggestions here).